Harvest of Doom! Part 3 – The Hub (Target: 11)
This is the final segment of Harvest of Doom!, an adventure based in a ruined aquaponics farm. In the prior segment, I detailed the last living tower, a vertical farm worked by robots. The PC's goal was to ascend the tower and open the giant aperture in its floor. The open aperture leads to this segment's goal- a priceless cache of seeds.
The control room at the top of the living tower in part 2 is the main boss fight of the adventure. When they get to part three, the PC's should need rest and low on resources. If they have been able to recharge, increase the difficulty.
When the aperture opens, PC's may lower the freight platform into the hub (10 effort). PC’s with a prosthetic link or a farm-linked datapad do magical effort (d8). (Part two explains the Effort mechanic.) The party can also lower themselves using ropes, levitation, etc.
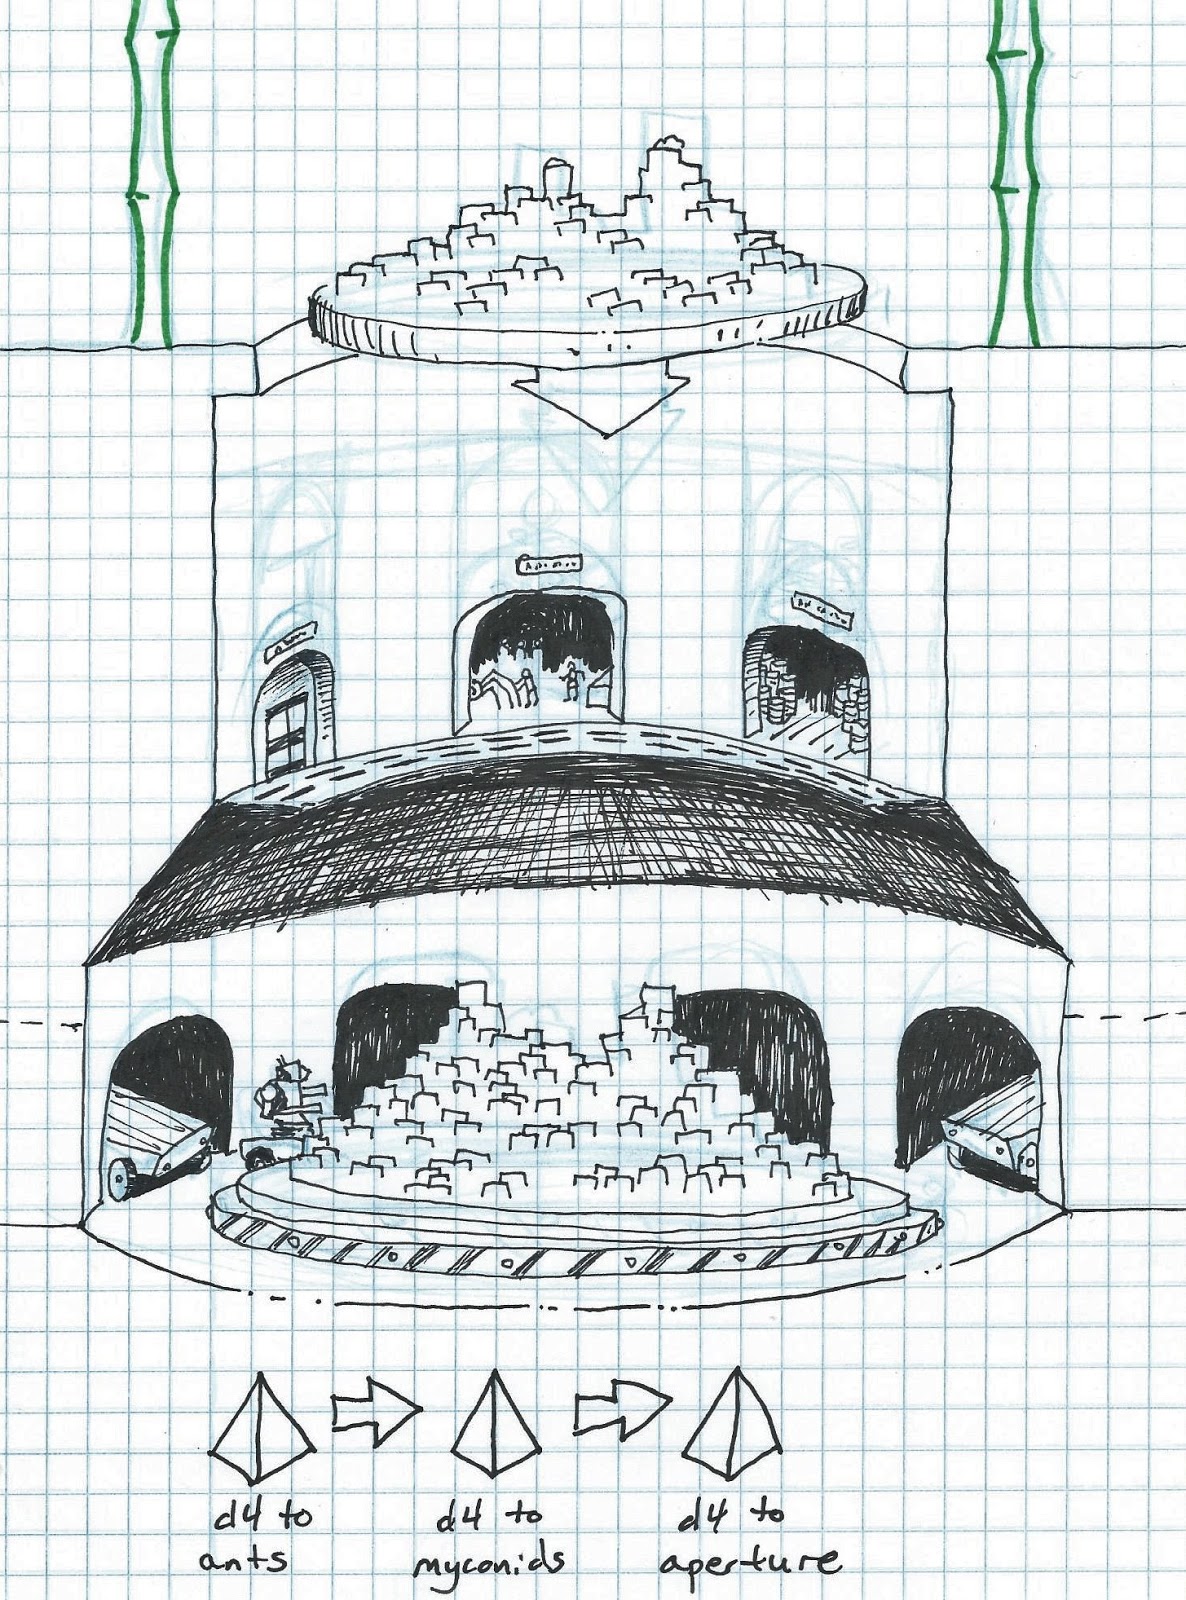
The hub has two levels: operations at the top, and distribution on the ground floor. The operations catwalk is twenty feet from the aperture; the ground floor is forty.

Operations Level
On this level, a catwalk encircles the main shaft. Six sets of double glass doors open to the farm's operational facilities:
- Robot repair shop. The lights flicker; otherwise, the shop is pristine. Two repair robots are working on a self-propelled tractor. Tools, materials, parts litter the room. The robots ignore the players unless attacked. This room contains three type A power cells and one type B cell.
- Chemical storage room. Two hazmat suits. Neat and clean, but dark. Open flames here are a bad idea.
- Fertilizer mixing lab. Almost identical to Chem Storage, but with workstations. Makes chemical mixing Easy for characters with appropriate skills or background.
- Fisheries management. This room is for monitoring aquaponics and catfish health. Catfish swim through the three aquaponics tubes running through the room. Monitors and diagnostic equipment crowd the space. Looping video shows a four-legged catfish leaping off a table and scuttling away.
- Dispatching office. Bones, manifests, coffee cups. Treasure: Farm-linked datapad. Includes shipping manifests that reveal locations of other hubs, farms and distribution depots. Effort 10 to unlock. A Hard check and twenty points of effort deactivate the robots on the hub floor. In the back of this office is a tram tunnel that leads to a small parking lot. The tram’s type B power cell is dead.
- Pesticide lab. Three monitor-bots are here, refilling with pesticide. They will ignore the characters unless attacked. Mixing chemicals in the lab is Easy for characters with appropriate skills.
Ground Level
On this level, eight openings lead away from the central hub. A low dais edged with safety lights marks off the circumference of the freight platform. Self-driving electric flatbeds stacked with crates sit in three of the tunnels. The others hold only darkness and a musty smell. Robot loaders stand motionless near the three trucks, covered in dust and cobwebs.
If the freight platform touches the dais, the robots power up and start moving crates to the flatbeds.
Timer 1 (d4)
There are three timers on this level. First timer: D4 rounds until five giant ants spill out of one of the empty tunnels. The ants go for the crates and PC’s; the robots attack the ants (unless the PC's deactivated the robots in the Operations office). Every round thereafter, d4 ants show up and attempt to take crates and small PC's back to their nest.
Threat
Giant ants! The PC’s must find the seeds and escape!
Treat
The seed crates are sealed and stamped with a symbol of a green sprout. (illo). Produce crates are open-topped and contain only desiccated compost. (Sharp PC's will see value in this as well.) The seeds are a great treasure in the famine-stricken wasteland. They will open doors for the PC’s to prestige, power and wealth. The robots will attempt to prevent the PC’s from taking the seeds and compost.
Timer 2 (d4)
Second timer: after the ants appear, roll a d4. In that many rounds, three myconid scouts appear from another tunnel and try to make off with the seeds. The robots will resist them.
Threat 2
Now the PC’s are in a three-way battle. The myconids carry shards of crystal that emit radiation. Treat them as rods/wands of poison. If the myconids take damage and have managed to grab a seed crate, they all run into a tunnel. If anyone pursues them they find only a weird door-sized tracery of mold on a solid wall.
Timer 3 (d4)
Third timer: after the myconids appear, rolla d4. In that many rounds, the giant aperture creaks to life and begins to close. The aperture works like an elevator; even slight resistance will open it again. The PC’s don’t know that, though. Hee, hee, hee…
Sequence
As soon as the PC’s hit the ground floor, the first timer starts. D4 rounds later, the ants arrive. They go for the crates and PC’s. The robots resist the ants if the robots are active.
As soon as the ants arrive, the second timer starts. D4 rounds later, the myconids arrive. They try to steal three seed crates and escape.
As soon as the myconids arrive, the third timer starts. D4 rounds later, the aperture begins to close.
This encounter is more about discovery and disruption than danger. There’s a lot going on, but nothing catastrophic. If the PC’s dally at the aperture before they descend, deciding to rest, have it sloooooowly begin to close. Emphasize how loud and massive it is. Even if the PC's discover how to reset the aperture, its closing routine is on a short, regular timer. The only way to keep it open is to jam it. Once the aperture is jammed, a crew of four spider bots will appear in 1d4 rounds to clear the jam and will fight to do so. Don't let the party rest if you can help it!
Other treats
Ingenious players will see many crafting opportunities on the Operations level. If they try to craft weapons out of chemicals or robot parts, let them! These are one-use magic items. Use effort to make crafting timely. If they spend too much time in Operations, roll the first timer and have the ants go for the seeds. Also, let them know what an explosives-crafting critical failure looks like. They may not even want to chance it. (Or that may be an incentive; players are nuts.)
The Tunnels
The tunnels can lead to food distribution depots anywhere in your wasteland. Mandate bases, population centers, research facilities, other farms, are all possibilities.
The tunnels are also a good way to connect locations in your wasteland. They can be a fast travel mechanism, providing safer camping. The tunnels can introduce different rules, challenges and subterranean encounter tables. What other things have discovered these efficient pathways? How have they adapted the tunnels for their own purposes?
Mechanics
Harvest of Doom is a great way to introduce Runehammer’s timers and effort to your game. These little tweaks will add tension, narrative gravity, and an element of fun to skill use. Try them out and see for yourself!
If you dig Harvest of Doom or Ragged Road in general, please share or pass a link along to your friends. Thanks!
No comments:
Post a Comment
Please make your comments here.